Friday, December 02, 2011

Handmade Card: Merry Christmas


I guess I'm addicted to woodgrain patterns!  I can't seem to resist using either my woodgrain stamp or my woodgrain embossing folder on card after card.  I like how very shiny the gold detailing on these leaves is!  Also, see the ends of the light green piece?  I punched just the ends with the Decorative Label Punch, one of my favorites. 

I am excited for the card sale tonight!

Wednesday, November 30, 2011

Handmade Card: Warm wishes

This toasty little gingerbread baby wishes you a warm and happy holiday!

I don't naturally gravitate to cute designs, but I really wanted to use this guy. My kids love the story Gingerbread Baby (the Jan Brett one, becasue she is just awesome!) so looking at this little man makes me happy.  I filled in his hands and feet with white heat embossing to make it look like icing.

And check out those buttons! They are cut out and embossed in one step with the Stampin' Up Sweet Buttons Embosslit Die and the Big Shot. Then of course I had to ink 'em and add some glitter!

Tuesday, November 29, 2011

Handmade Cards: Photo Cards

I've also been making some cards using photo art. I have a lot of different styles of these! I really like them and will be using some myself for some of my greeting card needs in the future. They use photos I took and editied and are on really nice quality cardstock bases. I don't know if they are less work than the regular handmade cards (all that photo editing is quite a learning curve for me!), but most of the work is up front so I can easily make multiples - thus, I'll be offering a little sale on sets of four of these!

Monday, November 28, 2011

Handmade Card: Baby

This baby is one-of-a-kind! I had that adorable b-a-b-y pennant set (but only one) and couldn't WAIT to make it into a card. This is another large, 5x7 beauty. Those raised dots (a Big Shot creation) are so sweet. The flower has a lot of soft dimension.

It was so much fun to make something soft and pink after all the BOY scrapbooking I do!

This will be for sale along with all the others I've been posting at the Holiday Sale. Come check it out!

P.S. Do the larger pictures work for you? Let me know if it looks right on your computer!!

December Daily: Foundation Pages (sort of)

It's almost December!  I'm very excited that I'll soon be starting my third annual December Daily album, as inspired by Ali Edwards.  I have enjoyed this project very much the past two years - here is the album I made two years ago.  I guess I didn't post last year's album, though I did make it and finished it pretty promptly!  The idea is to add a photo and/or story for every day of December to document the month.  Sometimes I do two pictures.  Sometimes I don't have a picture for a day and use something representative.  It's not strict!  It also doesn't need to be all holiday related - in some way it's a chance to document every day life alongside the Christmas season.

Most people completely make their foundation pages ahead of time (here's a beautiful example) but I find that doesn't quite work for me.  The idea is to make it easy to do during the busy December month... but I need it to be easy AND have the lure of a little creative play to keep me going.  So, I make pages, numbers and a few extras and let myself choose which to use each day.  I have them in a clear, zippered pencil pouch to keep the main items together.

The first photo is an idea of what the pages may look like when I choose what to use.  But I'll also probably make some pages that are just photos printed with borders and glued back to back.  The pages themselves are 5x7".  That way, I can use an occasional trimmed portrait-direction picture in amongst mostly landscape-direction pictures. 

This set-up is the same as my traveling vacation mini-book from 2010 (and the results are here).  This has been my favorite mini-book, both in process and in final product, so I decided to follow the pattern for my December Daily this year. 

I even have it in the same traveling clipboard, along with some scraps and random Christmas supplies.

Seeing that puts me in the holiday spirit!  Now I just need to get my Christmas decorations out of the attic! 

Saturday, November 26, 2011

Handmade Card: Count your blessings, not your birthdays

This card started out as something entirely different - it was going to have red and a chicken on it.    However, I'm so happy with how it turned out that I may make a few more! I think the little circle of cork is a fun texture and of course I love those embossed butterflies, made with the Beautiful Wings Embosslits die.  That's even a sparkly blue staple holding on the ribbon. 

I'm really getting excited for my card sale on Friday and Saturday!  Stay tuned for more pictures of cards!


Friday, November 25, 2011

Handmade Cards: All things bright and beautiful

Have you been out Black Friday shopping this morning?  That's our plan - it's a little tradition that always feels fun and adventurous.  We're a little disgruntled about shops being open on Thanksgiving.  I hope that doesn't ruin our Friday fun this year!

And now that we can officially kick off the Christmas season, here is my next card to show you.  These are also for the Holiday Sale and they were really fun to make with my new stamp set, Beautiful Season.  I made several of them, since I enjoyed them so much.  The holly and bird image is stamped and embossed (so that it is raised) and then hand painted with a combination of Stampin' Up! Watercolor Crayons and Luminarte paints. Doing these little paintings is therapeutic at the end of a long day!  The background is stamped and embossed with gold embossing powder in the Woodgrain Background stamp - one of my favorites.

The inside reads "May your season be blessed with all things bright & beautiful":  may your season start off that way, today!

Thursday, November 24, 2011

Happy Thanksgiving!

Here's wishing everyone a happy Thanksgiving holiday, with good food and grateful hearts.

Today I'm sharing with you a floral arrangement I made from a flower bunch I bought at Costco and a thrift-store (Valentine's day patterned) glass bowl.

I was really intimidated to make it when I started! I wanted it in a low bowl, but cutting the flowers down that much made me nervous. I find the most likely mistake I make when arranging flowers is leaving the stems too long for the container - when the stems are not cut down enough, you end up with something that looks like a flower bunch, stuck in a vase, rather than like a finished arrangement. But once you cut them you can't get them any longer, so I always feel that I'm overdoing it and messing it up! In the end the stems are almost always slightly too long (or a lot too long), if anything.

In this case I had to cut them down by half, and even then the tallest pieces ended up taller than I had planned. But, it looked good enough that I wasn't anxious to start over. I wrapped the decorative wrap from the original bunch around the bowl to make it match the arrangement and tied it with some rafia.

This is for my mother-in-law's birthday, and hopefully can double as decoration for her Thanksgiving table. We'll be spending our holiday there, for which we are very grateful! Have a lovely day, everyone.

Wednesday, November 23, 2011

Handmade Cards: happy birthday

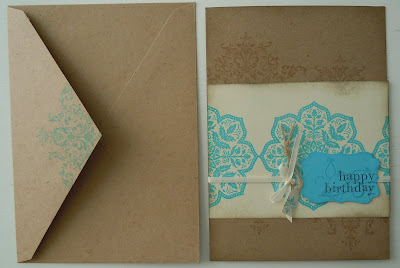
Here is the turquoise version with a "happy birthday" sentiment.  I chose to use the same stamps just because I was loving them so much!  The large floral medallion-style stamp is from Day of Gratitude by Stampin' Up.  That flourish from the background and the envelope is part of the Bliss set, which unfortunately can't be purchased right now.  The little tag is stamped with a tiny flourish from the Tiny Tags stamp set and punched out with the Jewelry Tag punch.  I love that punch!  I have a set of these done to sell... if someone buys all of them I'm going to have to make some more!

Tuesday, November 22, 2011

Handmade Cards: Thinking of You -and- Holiday Sale!

I've been busy making lots and lots of cards!  I'm going to be participating in a holiday sale by Amanda, at whose class I made my fused glass plate.  She is bringing together a few women to make or sell items here southwest Austin for a fun holiday event.

I've never sold my cards before but I'm excited about it.

This card (I have a set of these) is a large, 5x7 kraft card with matching envelope.  I've used stamps, ribbon, a tiny tag attached with a silver jump ring.  The sentiment reads "Thinking of You" in raised cream-colored ink.  The stamps are mostly by Stamin' Up! - aren't they pretty?

Monday, November 14, 2011

Fused Glass Plate

Check it out!! I'm so excited: I made a fused glass plate! I went to a class by my friend Amanda, otherwise known as icandyartglass.com . She had the tools and supplies in her glass studio at her home and we each got to make a plate in one of two shapes. It was very fun. No two looked ANYTHING alike! Everyone chose their own color combination and totally different designs. It was pretty cool to be able to create with glass and even though it sounds intimidating, it wasn't at all.

I intentionally chose a simple design so I wouldn't disappoint myself on the execution of my idea and I was happy with it. But the fired version is sooooo much prettier than I realized it would be! I was impressed! I loooove my plate. It was hard to photograph but it is very shiny and smooth and the glass has sparkles in it that didn't show up until after firing. It's very inspiring!

Also, if you live in the Austin area, Amanda is having an artist showcase in her studio on December 2 and 3. She'll be selling her work, as will other artists in the area. I'm going to sell some of my cards - something totally new for me! I'll post details as it gets closer.

Friday, November 04, 2011

Scrapbook Layout: Poetry Winner

Here is a scrapbook layout I did as an addition/complement to Zack's Kindergarten overview - the story of his poem he wrote for the school poetry contest. When he first heard there was a contest, with a winner for each grade, he dashed off a poem on the back of a page in a spiral notebook. It was written in green sparkly pen, very messy, with lots of random "decorations" all around. The spelling wasn't so great either! I knew we'd have to re-write it to submit it, but boy, was that a hard sell to Zack! He just hated having to write something already written and trying to use lowercase letters was really a trial. In desperation I resorted to... candy, of course!

I put an m&m at the end of every line, plus one for the title and one for his name and grade. He got to copy a line in his best handwriting and then take a "refreshing pause" and eat the m&m. Nothing could have worked better to get him to finish the copying!  Since we didn't get the original back, I snapped a photo before turning it in.


Zack's teacher told me that when the results were read over the loudspeaker at school that they didn't name a winner for kindergarten.  She had to run down and have them look again for K entries!  Maybe he was the only entry for Kindergarten... but I think he might have won anyway, don't you?  Hee hee.

What I liked most about Zack's poem was how it captured his love of books and alluded to the way he finds little hiding spots to squeeze into so he can be cozy while he reads.  Someday I'm going to make a mini-book about the boys and reading - right now I tag photos with "books" in Picasa as I go so that later I can find them to capture the reading moments over the years.  In the meantime, I wanted to make a layout about this particular story.
I normally make double-page layouts but I wanted some more variety and really, not every story needs two pages.  So, I was determined to make this a single page, even when it was a lot harder to switch than I expected!  I originally had printed the photos in 4x6 but then had to reprint some of them in different sizes to make it work.  I put the poem itself in 5x7 and then cropped it down to the right proportions for the writing.  The others I printed at half size.  The two small photos of the original poem I wanted small because although they are repetitive, I wanted to use both of them.  Small prints was the only way to make room.  The photo of Zack in the Reading Loft I printed small because it was so busy and so high-color that it overwhelmed the page in a 4x6 size.
I ended up struggling with this layout a very long time, walking away and returning to it a few times over a few weeks (yes, weeks!).  I wanted to use the blue construction paper "ribbon" they had given Zack but then had a hard time because it seemed so ugly with the dull color and uneven writing (I like handwriting, but usually I like writing of people I at least know!).  I finally decided it just "is what it is" and put it on there as the title.  I pumped up the contrast on the writing by going over it with Ranger black Enamel Accents.  I also sprayed it with Archival Mist since construction paper seems to fade soooo quickly, so we'll see if that helps long-term.

I also had a hard time fitting in that giant journaling block.  I wanted the whole thing to be balanced but I kept juggling the pictures.  Finally I got an arrangement I liked, but then when I added the paint and glued it down I realized I put everything farther to the left than I had planned.  Argh!  It turned out like this:

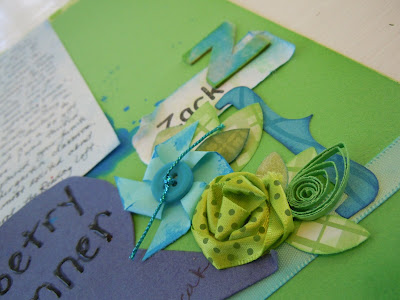
which I felt was pretty, but lop-sided.  I added my punched and inked leaves, echoing the foliage on the reading loft, a twisty ribbon flower, and a little paper pinwheel inspired by this quick video, but it still seemed lop-sided. 

Recently Noell from Paperclipping, a great instructional video site with some free and some paid content, has had some excellent posts on the visual weight of different items and how to use it to achieve balance. There is some content you can read, though you do have to be a member to watch the entire videos (I think the membership is totally worth the cost!).  I remembered how high-contrast things have high visual weight for their size, so I grabbed one of the label-sticker name tags Zack would come home from school wearing whenever the kids were meeting new people - I had saved several, in bad shape though they were.  I added a little blue and green inking along the curled up edges and also inked up a chipboard z.  After adding these I liked the balance of the whole thing.  Compare the first and last pictures (click on them for a better view) and see the difference!


Wednesday, November 02, 2011

Lookout, there's a ninjashark behind you...

I hope everyone had a great Halloween! We did, though my boys were VERY tired by the end of the weekend fun + Monday holiday. They made it through trick or treating with lots of smiles and lots of fun, though. And, neither had a meltdown at school yesterday so we're calling that a success. EARLY bedtimes this week! 

Friday, October 28, 2011

October Memories

We are loving watchingthe World Series together as a family. Every game is party time!
Posted by Picasa

Monday, October 24, 2011

Roasted "Baby Cabbages!" or Brussel Sprouts

I have been looking forward to roasting these Brussels sprouts for days and we've just been too busy to do it - which is silly because it was really fast!  I cut each sprout in half, tossed them with garlic, olive oil, salt and pepper and roasted them in a 450 degree oven until they were crispy and caramelized. 

I told the boys they were "baby cabbages" and they thought they were adorable.  Maybe they will grow up associating Brussels sprouts with YUM instead of yuck. 

One word of caution: you can see that I sliced my garlic - bad idea.  It got too done - not burned but over-browned.  I had to pull it out halfway through cooking and toss it (head in the oven, frying off my eyelashes...).  I should have done what I usually do, which is to crush each clove with the flat of a knife and toss them in whole. 

Give it a try, and Happy Roasting!

Saturday, October 22, 2011

Happy Saturday!


Check out Sammy at a Star Wars themed birthday party (by the way, the party was super cute with brown "padawan learner" tunics and a foam and duct tape light saber for each kid).   He thought himself quite fierce, though I thought him quite cute!

Have a great weekend!

Friday, October 21, 2011

Mini-Book: BEACH

I wanted to make a really simple little book from our trip and I wanted it finished the week we came back. Sound unlikely?  Well, I did it!  It was fun and came together soooo quickly!  Now I have a casual little booklet that the kids are enjoying looking at and I've carried around to a couple of people to show about our trip.

How could it possibly be fast, you ask?  Especially since we came back with over 500 pictures (from two cameras) and I loved lots of them!  I really did have to simplify in order to make the goal of a quick mini book practical.

Here are a few things I used to make it happen:
  1. Since I usually spend some time during the trip itself enjoying looking at my photos, I put that time to work and started choosing favorites during the trip.  That way after we got home I could finish narrowing down pretty quickly.  I chose 54 pictures to print so I obviously didn't narrow that much!  Since the book design is so simple, having that many pictures wasn't a problem.
  2. I cropped all of my pictures in portrait (up and down).  This was my first instinct, but then because there were a few that wouldn't work that way I rethought and rethought it before I came back around to it again.  The whole book would have been even faster if I had just accepted this idea to start with.  Luckily, in the struggle I found a couple of helpful things to do to make it easier.  I hope to post soon with more about that.  But however it is managed, having all the pics in the same orientation made the book come together very quickly.
  3. I wrote the story right on the pictures before I even printed them.  I used Picasa (a free program from Google) but lots of programs have a text tool.  I chose a cute font and added all my text in white over the darkest corner of the photo.  I only wrote on 23 of the photos, since a lot of them were just fun pics of the kids playing.  I included a couple of stories - like Sammy's fear of the sand - by using brief comments over a couple of photos (see below). 
  4. I printed the photos with a white border to add a double-matted look with a single matting. I love my Costco's print lab - cheap, fast and good quality (not all Costco's calibrate their printers as often... you'll have to check out yours) and the white border doesn't add to the $.13/print cost.
  5. I used nothing but plain black cardstock and a ribbon for the book.  I cut 8.5x11" cardstock into 5.5x6.5 pieces, getting two out of each sheet.  I scored each sheet just short of 1" from the edge, glued photos front and back, punched two holes and tied the whole lot together with a ribbon.  It took less than an hour, with interruptions from Sammy, to put it together. 
Didn't it turn out pretty?  One thing, though, it isn't the most robust.  It's just cardstock so it won't last forever.  I could easily make it tougher by adding some chipboard covers but I'm ok with it as it is - it's fun and most of all, it's DONE!