Showing posts with label Reuse-Repurpose. Show all posts

Thursday, September 26, 2013

Upcycled Starbucks Bag


For a while now I've been saving the packaging from my Starbucks coffee beans.  I buy coffee at Costco in 40 oz bags, so after I open up all the seams and wash the empty bags, I have a pretty large piece of material.  If you haven't felt of these bags, the material is a tough, plasticized foil, printed all the way around with the Starbucks bag design.  It would normally just be trash, so I think I started saving them because they seemed just tough and useful without having a specific idea of what to do with them.

The idea for the bag came about when I was wishing for a large, tough, not-easily-stained bag to take my stuff to the ballpark.  Both my boys play baseball so we are at the ballpark a lot.  I take a poster, a large scorepad and pencil, and various snacks to  every game.  I got tired of lugging things individually and none of my bags were right - mostly they were either too small for the 12x18" poster or not stiff enough.

When I recently got my new sewing machine (which I should post about!  We'll see if I get around to it though), I finally worked up the motivation to make my envisioned tote bag.  I started with five coffee bags, plus an extra, small bag from another brand of coffee that I sewed in as a pocket. I used two bags of the newer packaging design for the outer material, two bags of the older bag design for the inner liner, and another older design bag for the handles and a little anchoring strip inside the bag.  I also used some sew-in interfacing purchased from Hobby Lobby to give it a little more stiffness and something in between the layers of foil.

 To make it, I took four of the bags and trimmed off the previously crimped edges and made them all the same size.   I should have sewn the pocket and anchoring strip in at this point, but I forgot and had to struggle with it later.  But it would have been the right time to do it!  I sewed the inner pieces, right sides together, on the sides and bottom.  I did the same with the outer pieces, but also with the lining on the wrong side of the "fabric" (it was a stack of four pieces - lining, fabric, fabric, lining).  Then on each bottom corner of each bag (inner and outer), I sewed across the bottom corner and cut off the resulting triangle so that it would make a box-bottom. 

I made the handles with four strips of the extra fabric.  I sewed two strips together (attaching the short ends) so that they would be long enough to carry my poster in my finished bag.  A person would normally sew a tube, turn it right-side out, then use it as-is or after top stitching it, but this material is way too stiff and difficult for that.  Instead I just finger pressed the edges under and sewed it right sides out.  

My plan had been to nest the two bags, right sides together, sew the top seam except for a few inches, turn it right-side-out through the hole and then top stitch it closed.  However, turning just one bag, before sewing them together, was so difficult that I realized I would never be able to turn it through a hole.  SO, I folded in the top toward the wrong side on each of the bags and finger pressed it.  Then I put the bags inside each other, wrong-sides-together, placed the handles where I wanted them, and sewed around the entire top.  I had to fudge a little since the inner bag was not smaller than the outer bag and there is no stretch to the material.  What this meant in practice was sewing them together with the seams of the inner bag not quite all the way open.  It seems to have worked great!  I did reinforce the area over the handles with some extra stitches.

This material is not easy to work with.  The lack of stretch and the fact that every pin hole is permanent meant that I didn't want to pin much, and yet I needed to sew the pieces together without some helpful stitching that would be there if I were working with traditional fabric.  I am not planning to run out and make five more of these (yes, I do have coffee bags left!), but I love the result!

Friday, September 02, 2011

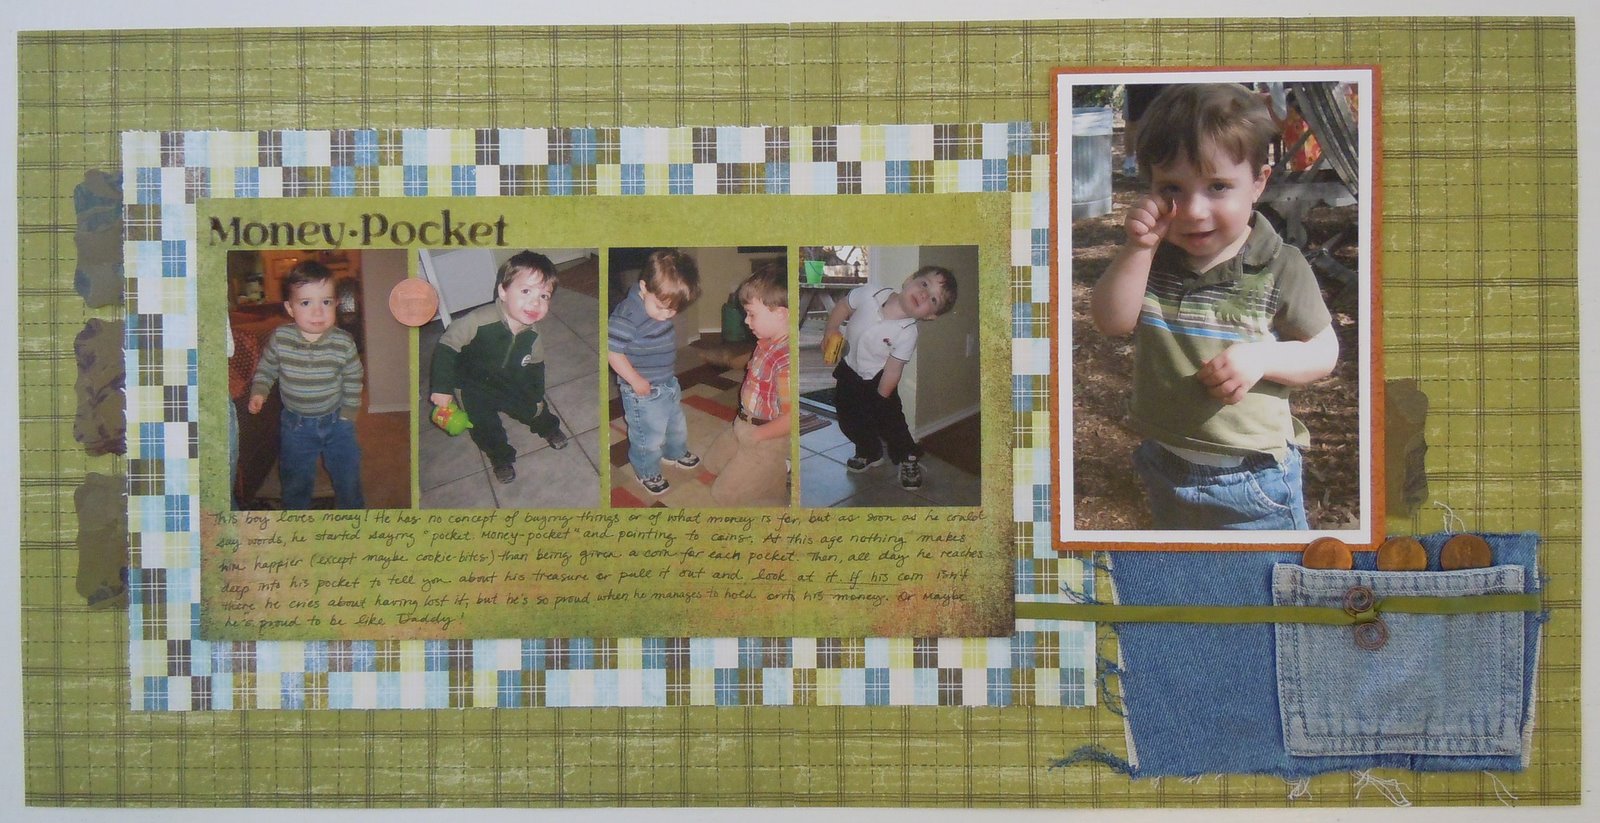
Scrapbook Layout: Money-Pocket

 
(as always, click on photo to see a larger version)
I wrote about Sammy's love for money in his pocket quite some time ago, but recently I was looking through our pictures and I decided I wanted a scrapbook layout about it too.  It was really fun to make because:
1) The journaling was already written in the blog post, so I could just play and not have to think too much, and
2) I threw in some non-traditional embellishments. 

That pocket is off a little pair of overalls Sammy had outgrown.  They had a hole in the front so I have been using them for various projects.  I pulled the strap hardware off for an earlier project and cut the little pocket out for this layout.  I like how the lighter fabric makes the pocket show up.  I also frayed out the edges of the surrounding denim to give it a well-worn look.

Also, those are real pennies - a shiny one for the embellishment on the photo strip and three darker ones to peek out of the pocket.  I was pretty amused by the idea of putting them on my layout.  The shiny one is dated the same year the photos are taken.  These are probably the cheapest embellishment around! Hee hee.

There are some random re-purposed bit in there too - the decorative labels are punched out of the pretty envelope this year's calendar came in, the green ribbon was a hanger strap off a dress (I always cut them off anyway so they aren't showing when I'm wearing the dress, but then I really liked the color), and the copper photo mat was a piece of a wedding invitation.  Strange stuff to save but pretty fun to use!

Monday, October 11, 2010

Awesome Candy Card

Check out this great card Julie made Zack for his birthday! It is filled with skittles and as you can imagine, was a big hit with Zack. It went with pirate party perfectly.

The candy box is made from some packaging - very cool recycling! And, she made a slide-out back so that the card doesn't have to be torn to get to the candy.  Cheryl's Halloween treats are done that way too this year and I really like it.  Clever stuff.  

Wednesday, March 31, 2010

A Spring Card

My friend and stamp teacher, Cheryl (here's an an example of her work), challenged her group this past month to make a spring card using a theme of circles. Here was mine.

I made the flower a while ago so it was time to get it onto a card. I used a resist technique to create raised circles on the pink background circle of paper, but the effort doesn't show much (here's an example and video that shows a much more dramatic result). In person it shows more that the main areas of that pink circle paper are slightly lighter and sparkly. One thing I like about this card is that green raffia, partly because of the color but partly because was a bit of trash off something else - that kind of reuse makes me happy.

Sunday, February 14, 2010

Happy Valentines Day!

Happy Valentines to all!

We spent the day in various family activities - church, lunch with friends and grandparents, naps, geocacheing and pizza for dinner. James and I have a hot date scheduled tomorrow night after the crowds are gone from the restaurants.

I sent little candy machine valentines, made in a class hosted by Cheryl (second photo down), to preschool with Zack. I don't know what the kids thought of them, but Zack was really excited. So, when it was time to make a Valentine for Zack, I thought this over-the-top version would be just the thing. It was made from the packaging for Terrifically Tacky Tape, by Provo Craft, which I picked up at Walmart (this is the same as Sticky Strip or Art Accentz Terrifically Tacky Tape). The tape package has a raised plastic circle, which I cut out and used like Stampin' Up's Sweet Treat Cups, just much bigger. I had to draw the hot air balloon myself, but it was pretty simple. The "Sweet You" is done with stamps. Zack was appropriately enthusiastic. :)

Saturday, August 01, 2009

Experimenting with embellishments

Do your hobbies run in trends? You may have noticed that I'm on a scrapbooking kick lately. Those scrapbooking sites and blogs I discovered have me thinking differently about my layouts and my supplies. It's eye opening, but I think I might be making even slower progress than I was before, stopping to think about things in a new way.

Last night I was experimenting with embellishments. I wanted something just so - something I didn't quite have. I took apart a ribbon spool and started working on making it into something new. I've seen people peel of the glossy top layer of purchased chipboard accents and ink them up for a different texture and look. I don't have the type of ink that I've seen used, but even if it I don't end up with something I can use, I don't suppose I've lost anything.

I'll show the finished layout soon and let you know how it works out.

Monday, July 20, 2009

A Little Storage

Have you noticed that crafters (and maybe all hobbyists) are always working on storage solutions? We have an idea, we reorganize, we sort things by use, then we sort them by color, we sort them by size, then we do it all again. It's a road that never really ends.
This box was the packaging from a set of cards from Costco. I didn't have any ideas for it, but it just seemed too handy to toss when the cards were gone. Meanwhile, I've been struggling with my stamp storage. I like to use clear acrylic stamps. They are easier to position than traditional rubber stamps and take up much less storage room. But, I've wanted a good way to keep them and be able to see them.

Last year at school-supply stock-up time, I copied what my sister's new storage plan and bought a big stack of clear binder pouches. They are made to hold your pencils in a three ring binder but are perfectly size to hold a sheet of stamps. It works well because I can keep from loosing any little pieces and see what I have when I flip through them. I put the pouches in a three ring binder, but they were way too fat for the spine, and that made them unwieldy.

This box became the impromptu solution. I used an X-acto knife to remove the center partition (and stuck the point of the knife directly into my index finger - ooouch!). It left an unfinished seam, but if I like the use of the box, I can recover the inside someday.

Now I have my stamps, my acrylic mounting blocks and my stamp cleaner here. It fits in the hutch of my hobby desk, isn't too cumbersome to take along to crops, and has been easy to use so far. It may turn out to be just a stop along the storage road - we'll see!


I've been inspired by these posts on scrap organization:
Celeste, last week's host of Write.Click.Scrapbook. talking about sorting by color
Noell of Paperclipping gives a video tour of her scrap room
And Melissa writing at Write.Click.Scrapbook starts with carving out a space and continues with a series of several great posts with pictures, links and ideas.

Thursday, April 30, 2009

Stroller Tote

I'm quite pleased (and a little relieved) to be telling you about this Stroller Tote. I started it in Tucson and, despite having only one small step left to do at home, I wasn't sure I was going to follow through and finish it. But I did finish and here it is!

I wanted a reusable shopping bag (and book bag and whatever bag) that I could clip to my stroller. All my reusable bags have narrow tops that won't hang on my stroller. This one is not only shaped correctly with a wide opening, but has a clip on each side that attaches over the handle. There is also a shoulder strap for carrying it normally. There is a little pocket inside, made out one of the corners that were snipped off when we created the box-bottom shape.

The fabrics are two coordinating prints in upholstery weight cotton. It's pretty sturdy stuff with a canvas type feel. My mom frequents a discount fabric place that has such fabrics for $3 - 6 per yard. We found these and really loved them; at $6/yard they were a really good buy. The clips are made out of some repurposed clips from baby's overalls. I discovered that you can reuse the clips and adjusting rings, but not the buttons, so I bought new buttons.


The design was based on my measurements for what I wanted to end up with. Mom and I came up with the plan for making it a bit ahead of time and a bit as we went along. I've already been using it, despite just finishing the clips today, and it is very handy. It's large enough to hold a gallon of milk and a selection of other groceries, a big stack of library books, or plenty of fabric and supplies to start a few more projects I might not finish!

I'm toying with the idea of making more, which means I need to transfer the notes we made as we went to something I'll be able to decipher later (and do it now, before I forget what they mean). I'd be interested to know if others are wanting a bag this shape as much as I was!

Wednesday, April 29, 2009

Gift Tag


A little re-purposing project today!

A couple of weeks ago I was at a lovely baby shower with stacks of little china plates (not all matching - just several sets stacked together!), pretty little footed glasses, and silver forks wrapped in little cloth napkins and tied with ribbons. This was not a little party, so being able to use all reusable items, and pretty ones at that, was quite a feat. The ribbons around the fork and napkins sets were so pretty. A wonderful lady, and blog reader, Ruth, handed me hers and said, "There! See if you can do something with that!". Who could resist such a fun little challenge?

This is a gift tag I made from the front and back of a greeting card I'd received. The insides were written on, but who could tell after I glued them together and rounded the corners? The fern motif was part of the original card. The words "To:" and "From:" were stamped on the back with a little silver flourish and the ribbon finished it off. In keeping with the party: little and pretty! Happy gifting, Ruth!

Saturday, April 25, 2009

Army Quilt


My family has this Army Quilt. It is something my Dad made when he was a kid, maybe in high school, from gathered and repurposed army khakis. He is the oldest of five: four boys and one girl. By the time his sister was born, I think she was the darling of the family. He recalls making her some doll clothes (a high school boy making his baby sister doll clothes? Nothing could say love more!) and shortly thereafter deciding to make this quilt. It is sewn irregularly, in overlapping groups, out of bits of shirts and pants. You can see the flat felt seams (those double seams on the sides of jeans that don't show a seam inside or out) from the pants, some embroidered names we don't recognize anymore, and places where patches have been removed. Where it has been torn or worn through (or maybe those were worn-through knees to start with?), you can see other random fabrics inside, a blue plaid here a red check there, though Dad doesn't remember what they were from.

This quilt has been on innumerable camping trips. We've used it in the bottom of the tent, on the ground, on tables, everywhere. It is the heaviest quilt possible, bulky to fold and lug around. But it's so handy to have that sturdy, heavy fabric at the ready.

Last Saturday, we took the day to go up to the foothills of the Catalina mountains and take the kids on four-wheeler rides and have a picnic. The area was prettier through the gates where the four-wheeler could go but the truck couldn't; in the area where we could park the truck it was a little dry and stickery. So, we spread the Army Quilt in the back of the truck and that became play-pen, lounge area and picnic spot. Sammy crawled all over it, loving the truck bed and everything "guy" in it.

It struck me what a great repurposing project this quilt was. I had to photograph those seams, the crooked quilting, the leftover strings from patches removed. Maybe someday we'll have the materials to make another, but I would have to have a heavier sewing machine than mine to be able to sew it! In the meantime, I'm marveling at how many years of use the quilt has given, and how many more it has left to give, and I'm impressed with my Dad for making it.

Friday, April 03, 2009

Friday Favorite: Sandwich and Snack Saks

Check out these awesome little reusable baggies! I found them at this shop just clicking around on Etsy (oh no, that's not a time sink...). I kept thinking I should try to make some, but (a) I didn't have all the supplies, (b) my un-done project list is way too long, and (c) the way these are made is beyond my present sewing skills. I finally just requested a custom set in greens and browns - my favorites! - and I'm so glad I did. They are working out really well.

I got one sandwich size and two snack size. They are cotton outside with a nylon lining inside and a full strip of velcro as a closure. The nylon is loose from the cotton so that it can be turned inside out and the velcro is sewn in very securely. There are several shops that sell this type of item, but I am really enjoying these!

I've been filling them with our little snack mix or crackers or sandwiches. When I use them for snack foods, I just shake out the crumbs and keep going. After a sandwhich, I either turn the nylon lining inside out and rinse it in the sink or run the whole thing through the washing mashine. In addition to being easy to use and reuse, I love that they are so easy for Zack to spot in our bag and close back up himself. And, really, seeing the fabrics makes me happy.

Monday, March 30, 2009

Another binder clip

Remember those cool shiny metalic colored binder clips I'm using on our napkins? I really like seeing them (yes, I am obsessed with office supplies).

My sister reminded me I can use them for a recipe card holder while making a dish. I guess it doesn't take much to make me smile because this does it!

Wednesday, March 25, 2009

Reuse


I know it's a little nutty seeming to some, but waste bothers me. It's just a napkin, but seeing multiples grabbed and tossed for a little wipe or to underlay a piece of toast... well, I start to twitch a little.

I was at a friends house a couple of weeks ago. We ate a quick lunch of leftovers while the kids played and she handed me a cloth napkin. I was halfway through my lunch before I noticed I wasn't using a paper napkin. It seemed very normal and not at all overly-fancied-up. I asked, and it turns out they use cloth for all their meals and might grab something paper if they have a major mess. What a good idea!

I wondered what James would think of such. He enthusiastically declared that if we got to have cloth napkins, we could have placemats, which he wishes to use (why? I don't know). I don't have placemats I like, so until I make these, we decided to try the cloth napkins. After all, I already have a couple of sets that I'm happy to use for everyday. It doesn't cost anything and they don't take up much room in the wash.

I put them out in the napkin holder with a specific binder clip for each of us (aren't these fun binder clips? They're from Staples and in the store you can mix and match your pattern choices). Zack immediately remembered which was his and will grab it himself when he's eating on his own. We decided we could use them again if they seemed "still clean". Otherwise, or at the end of the day, I put them in the wash and grab new ones, not worrying about a matching set. I wasn't sure at first if we'd keep with this, but after doing it for a bit, I think we will.

Pretty low key, but I am loving the difference. I like the feeling of reusing.

(And scroll down to enter the giveaway!)

Wednesday, March 11, 2009

Eeeeeee!


Ok, I admit it, I am ridiculously excited about this craft! I think I'm more excited than Zack. Possibly it's that without any daughters I don't get my proper fix of tiny and cute? Even so, Zack's pretty excited too. We made shrinky dinks out of recycled plastic!

Did you do shrinky dinks as a kid? I remember they were cool but not much else about them. A while ago I saw on a blog that #6 plastic is shrinky dink raw material. When we came home from lunch on Monday with some #6 takeout boxes (finally!!), I went back to look for instructions. I couldn't find the post I first saw [here it is!], but I did google it and there are lots of examples and tips out there.

I drew an outline drawing of a frog for Zack to color in. Then he drew his own drawing of a person. When he saw me making a butterfly, he wanted to make one too. Then when I was cutting out the colored designs, he needed entertainment, so I made his name in bubble letters for him to color. So, we just played around drawing and coloring. After shrinking, everything came out about a third or a quarter of the original size and so cute. I have 47 half-baked (groan) ideas for stuff to use shrinky dinks on!


Here's the full instructions:
  1. Save those thin, clear, stiff #6 plastic takeout boxes and cut out the flat parts (the other parts work too if you have ideas for what to do with them).
  2. Draw (or trace coloring books to color in) and color designs with Sharpies on #6 plastic. (We put the foil for later right on the table, wrapping it around the front edge to protect the table from those Sharpies.) If you are going to want to thread the finished product on something, punch a regular size hole.
  3. Cut out your design.
  4. Lay it on a piece of foil (or parchment) and bake in a pre-heated 300 degree oven for about 2 minutes. It will curl up and then fall back mostly flat. Flatten (or shape) immediately before it cools (before you set the foil on a cool counter) if you want it flatter (and clearly, don't burn yourself, yada yada).
  5. Eeeeee! So cute!
- Preparation rating: Maybe 20 minutes to dig out the Sharpies from where they were hidden from the children, find a couple cute shapes to trace, and cut up the box. Pretty easy.
- Cleanup rating: 5 minutes to toss the scraps and re-hide the Sharpies. Very easy.
- Trouble to payoff rating: Very good. No mess, no drying time, baking time is fun to watch, cools very quickly, pieces are not fragile.

I was a little concerned about toxic fumes before I did this, but it really seemed fine. Way less fume-y than, say, microwaving in a styrofoam container (not that I want to do that, yuck).

------------------------------------------------------------------------------------

Ugh. My crafty excitement has collapsed. We had a cutie little morning with everything going well, when I realized I have double-booked myself for a family vacation (and was one click away from plane ticket purchase) and coordinating a wedding. Then the baby woke up and I realized that I was out of kiddo naptime and completely unprepared with the work I was supposed to do for a church meeting tonight. Now the baby is crying because he can't chew his apple, I'm trying to accomplish something, and Zack is running in circles, wanting undivided attention again.

Insert musical collapsing-wind-down-crashing sounds here. But don't let that ruin your crafty fun...

Monday, March 02, 2009

Party Favors


I've had to remind myself repeatedly this past week that I like making things. I picked something to make for party favors because I wanted to. It's that trying-to-have-more-homemade thing. In general, my urge to re-purpose things, to make things myself, to have a result that wasn't industrially extruded seems has been growing stronger over time. But I have to say that it came close to being extinguished after this little project.

It's an easy project. I just made too many of them. I had a lot of fun up to a point, and then I just got stressed with it. So, if you make these, make a couple, not 26.

These are activity pads. They are like a clipboard, but instead of a clip, there is a ribbon tied through the pages. I chose them because it was something I wanted to have for my kids. I wanted a small format and stiff backing for Zack to color on at the doctor's office, in the church pew, or in his carseat. I wanted to make him a bunch of mazes since he's maze-crazy these days. And after seeing the great hand-drawn artwork from flipflops&applesauce, I was itching to draw some coloring pages. After working on my own, I can see how very well done hers are!

The backings of these are old boardbooks that I picked up at Goodwill and cut apart with a box cutter and punched with a regular hole punch. Then I covered each with scraps of fabric I already had using elmer's glue. The edges of the fabric are wrapped around the edges then covered by a sheet of paper. I drew some of the pages and made the others on the computer, adding hand-drawn borders or woodland creatures.

Lucky me, Office Depot sent me a free $10 copy card in the mail, which covered all the copies with some to spare. And, they had a large paper cutter, so the cutting was super fast. Here is my excellent helper, James' mom, punching and collating pages!

And here are the finished pads. Zack promptly did all his pages and I'm supposed to make him some more!

Monday, October 06, 2008

P is for Party

We had an M is for Man on the Moon party this year based on Zack's interest in astronauts' journey to the moon and back.

Zack and I made the invitations together (ok, I mostly made them, but he "helped"). They were black with silver stamped text and decorations. I am loving stamping, which my sister got me started on. This was my excuse to get some metallic ink, which I'm excited about. We also glued on (yes, individually) silver stars, small confetti sized ones. Zack would have liked to put about 50 on each side of each card. I only had the patience for three on each invitation.

Our table theme was "S is for Space" so all the food started with S. We had sugar snap peas and squash with spinach dip. There were strawberries and salted soynuts. We had salsa and Santitas tortilla chips. Finally, there were star-shaped sandwiches - peanut butter on white for the kids and caprese on wheat and cheese on pumpernickel for the adults. Too bad I gave in and served crackers with the spinach dip... they were those new "scrackers", yeah, that's it... This picture is before I distributed the Starburst around the table and sprinkled the silver star confetti around. The plates, napkins and forks were silver. I had a great time thinking of foods that started with S to serve, but if you try it be forewarned that it gets in your head. I started speaking solely in sibilant sounds, the sneaky s's stealing into my speech.

I'll point out that when I brought the remainder of the veggies and dip to a church function, I did have a lady there a bit puzzled about this having been food for a kids' party (I didn't even tell her I had to talk myself out of the sushi). It hadn't occurred to me that veggies weren't normal foods to feed kids. But, there were parents at the party, so it was for adults too. I'm glad all that real nutrition wasn't wasted on children. [Abort, abort usual soapbox rant! Return to party report!]

The cake was in the shape of a space shuttle and was seven-up flavor - yum. This was my favorite flavor growing up and it was fun that Zack chose it as well.
For our activity we had a journey to the moon! First we made helmets out of white paper bags. The paper bags were prepared before the party (by Glenn, yay for Glenn) by cutting off the handles, cutting slots for the shoulders and a circle out for the face, then putting a transparency in for a face shield. Since we started with 8x10 plain gift bags (because that was what I could find in a value pack), they were just barely big enough for the kids with the transparency squishing their noses. They didn't seem to mind. We used a black pipe cleaner to form a headset microphone for each helmet. Then the kids got to decorate their helmets with markers, crayons, metallic stars, puffy foam stars and glow-in-the-dark stars. Our friend Lily was the cutest, requesting to "go glow my stars". We stepped in the powder room to see the glow - fun!Then we headed out to the yard where we had a cardboard space shuttle and blasted off to the moon! Uncle Glenn had helped with the artwork, hence the professional appearance. It was a bit of a puzzle to figure out how to make it. James' parents tracked down a refrigerator box for us, so we had a large, sturdy piece of cardboard to begin with. We sketched out a plan, then the shape out of the cardboard, leaving the bottom of it attached to the next panel of the box. That way, we would be able to clamp the panel to the table with big garden clamps and stand the shuttle side up with extra large binder clamps. We used spray paint to paint the shuttle half white, then Glen finalized the design with sharpie over the paint. It ended up to be a sophisticated coloring-book level of detail, and really cool looking. He even did the swoopy little NASA symbol!
The kids climbed up onto the picnic table and we shouted a countdown and blastoff. Then they each picked up a "moonrock" from the yard. The moonrocks were remarkably egg shaped and filled with Pop Rocks - who knew! They were nice moonrocky colors thanks to some acrylic craft paint.
The spaceship became even more entertainment when we laid it flat and let the kids work on coloring and decorating it too.

After cake and all the final birthday festivities, we sent each guest home with a jumbo crayon made in the shape of their first initial. Zack and I made them by melting down his old crayons, though we ran out of the broken ones and used regular crayons too. We poured the melted colors into candy molds and let them set. The finished crayons went into clear bags marked "Z is for Zack" and so on.

We really enjoyed the party and Zack had a great time. We couldn't bring ourselves to throw the space shuttle away, so we still have a gigantic cardboard in the shape of a shuttle in the garage. I guess that could come in handy someday?? As much fun as it was, since it came on the heels of elk camp I was very glad to have it done so I could move on to the next thing!